Posts

Showing posts from 2024

These Wild Burlap-crete Outside Wall Hangings

Image
These large pieces involve sculpting mortar over burlap infused with industrial grout. The largest piece (below) is about 24" wide. All are designed to hang on a outdoor wall or in the garden.   Ra -- sun god. A merman Mushrooms -- burlap-crete stems, concrete tops. Per request for my wife's recent birthday.

Drape Pots & Little Garden Hangers

Image
Made with untreated burlap soaked in concrete fortifier, saturated with industrial grout, and layered many times with mortar. These steps insure a strong planter that will last forever. "Sculpting" mortar over a concrete base.  

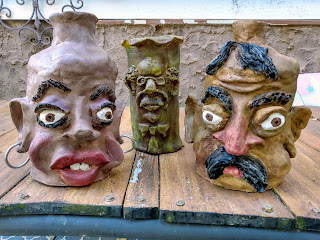
These Painted Terracotta Jugs

Image
 

DIY Swimming Pool Refurbished

Image
This little swimming pool -- about 12' x 6' x 4.5' deep-- is almost thirty years old and has been refurbished several times. It needed some patching and painting and we almost did away with it, but in the end couldn't part with it. We used an epoxy pool paint this time -- a deeper blue and very pretty, I think. Small, but perfect for a dip in the evening.  Here is a younger me digging that hole.  Paradise days -- my lovely wife and our good dog, Henry.

Recent Polymer Clay/Mixed Media Efforts

Image
  She is about 10.5 inches -- entire piece about 16"x16" The tallest figure is about 11". Bed is about 9" x 12". She is about 12" tall.

Ferrocement Fire Circle Entrance

Image
Various mixes of Portland cement mortar over hardware cloth and poultry wire, stained with exterior wood stain and Rustoleum latex enamel.    

ROCKET KILN EXPERIMENT #1

Image
  My four pieces that were fired in my rocket kiln. I'm still painting my bisqued earthenware with acrylics.  I want to be able to fire my ceramic efforts here, at home, and have no space for an electric kiln. I liked the idea of a rocket kiln -- less fuel, more heat, less time. It was an interesting experiment but not a raving success. I made a few mistakes, learning as I went and sometimes, sadly, after the fact. The temp inside my barrel kiln reached 1480F at its peak -- short of my goal of a sustained 1900F. I'll be trying to correct my mistakes and going another round with my rocket kiln soon.  The heat riser was cast from vermiculite cement -- 4 parts vermiculite to one part cement. I got the idea from a video I watched about building rocket stoves. I later learned that concrete -- even vermiculite or pearlite concrete -- is not ideal for achieving the kind of temps that firing ceramics requires. However, I'm sticking with it for now, even in my rebuild. There is cu...

CHARCOAL KILN EXPERIMENT

Image
  The pieces shown here were painted with exterior acrylics after firing in my charcoal kiln. I only recently started working and playing with ceramic clay, and I wanted a way to fire my experiments without access to an electric kiln. I wouldn't have known where to start without a great video on Youtube by Tony Soares, a Native American potter. My three pots were bone dry. It was chilly outside where they sat, so they were cold to the touch,  I preheated them in our kitchen oven, starting at 175 degrees and working up to 500 degrees. The process took about an hour.  I had the idea of building the kiln inside our fire ring for safety, but as it burned I saw it wasn't necessary and, thinking the ring might impede air flow, I eventually removed it. To build my kiln, I first placed a piece of sheet metal on the ground and made the base on top of it. I happened to have these bricks with holes in them, and thought they would enhance air flow. I placed a small metal grate on bri...