Resurfacing the Papercrete Garden Wall #1
 |
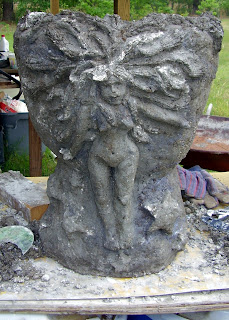
| A work in progress -- refinishing the papercrete garden wall. |
Papercrete, I think, for most of us, involves a lot of experimentation and a good sized learning
curve. There is information on line, but most of it is like the information in this
blog – experimental recipes and processes that offer a starting place for our own endeavors. Those
batches of papercrete I mixed two or three years ago for the garden wall were, like the first layers daubed onto
the gazebo structure, too soft for exterior work– too much paper, not enough sand.
The strongest, most workable papercrete has been the heaviest – lotsa sand,
some paper, some cement, some ready-mix joint compound to help it stick.
The same learning curve applies to the lime plaster applied to the garden wall a couple
of years ago. Though the surface of the inside wall was still looking fair, the outside surface was
brittle and full of cracks. Possible causes are plentiful. Like my practically
nonexistent curing process. Or maybe my practically nonexistent prep of the
papercrete prior to application (a bonding agent may have helped). But, since the shaded areas of the wall did
better, my first thought seems most viable – the very harsh sun beating on the
outside surfaces and drought-like summers of the last two years. I never wet the lime plaster, and just let nature take it's course.
At any rate, the lime-putty-and-sand plaster was easy to
remove. Some of it flaked right off. Other parts needed to be tapped with a
hammer. The remainder comes off using a high pressure nozzle on a garden
hose, which also roughs up the underlying papercrete surface.
I decided to refinish the wall using the sandy papercrete mix with which I finished the gazebo – the mix discovered when I mixed too much mortar for another project and added paper so as not to waste it. That sandy mix, applied to the gazebo, made a hard shell over softer mixtures of papercrete. This will give me.an opportunity to create a more interesting mural on the surface of the wall, which is how I envisioned it to begin with.
I decided to refinish the wall using the sandy papercrete mix with which I finished the gazebo – the mix discovered when I mixed too much mortar for another project and added paper so as not to waste it. That sandy mix, applied to the gazebo, made a hard shell over softer mixtures of papercrete. This will give me.an opportunity to create a more interesting mural on the surface of the wall, which is how I envisioned it to begin with.
My mix, using a two pound coffee can for measuring, is six
parts sand, three parts cellulose insulation, three parts Portland cement, water, and joint
compound. I used my Harbor Freight
cement mixer to mix the sand, pulverized paper, and cement. I added water until the mix until it was damp and clumpy, and I could squeeze
it into a ball without ringing out any water. I put a portion of this mix into
a five gallon bucket and hand mixed in a gob of joint compound. This is a
workable mix and makes a hard shell, though it’s easy to put too much joint
compound in. I wet the surface of the wall thoroughly, and used a spray bottle to apply bonding agent as I added papercrete.


ReplyDeleteNice article as for me. It would be great to read something more concerning this theme. The only thing it would also be great to see on this blog is some pics of some gadgets.
I love the truth that trial and error process of art is half the fun. I have been experimenting with the best way to make cement flowers and it would read the same way!
ReplyDelete