Posts

Showing posts from April, 2012

Hypertufa/Papercrete Planter
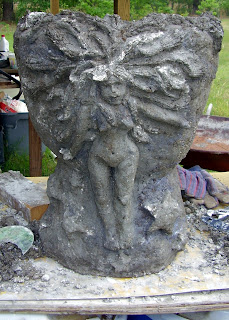
Image
 The base coat on this planter is plain old hypertufa consisting of (using 2-pound coffee cans for measurement) one can of peat moss, one of Pearlite, ½ of Portland Cement, one of water (there about), and a little lime putty. I’d made the armature using two old, sun-beaten, brittle planters that were ready for the landfill fastened together with sheet metal screws and covered with two layers of poultry wire (see photos below). So far I’ve found that this type of Hypertufa mix is good for casting but is honestly difficult to daub onto wire without either ready mix joint compound or lime putty to make it stickier. Even then it doesn’t seem very workable. Perhaps more cement to the mix would make it stick to the armature better. I'll continue to research and experiment. As it was, I applied the hypertufa with some force to push it deep into the wire and keep it from falling off. For the design on front I used the same mixture as above, but substituted cellulose insulation for...

Hypertufa/Papercrete "clay" with lime putty

Image
This is a nice, easy to use garden sculpture mix, using “2-pound” coffee cans for measuring and mixing by (rubber gloved) hand in a five gallon bucket. ½ can Portland cement 1 can peat moss 1 can cellulose insulation 1 can water (there abouts…damp (not wet) mix) Substitute lime putty for ready mix joint compound. Add a big gob of  it and mix well. Lime putty is builder’s lime mixed with water to a pasty consistency.You will probably need to go to a builder's supply to purchase builder's lime. Neither Lowe's nor Home Depot carry it. This lime putty had set for many months in a sealed five gallon bucket, and was a little “thinner” than ready mix joint compound, and not so sticky. I think that is what made this mixture feel so good. This hyper-tufa “clay” was truly "clay-like" and easy to model over a chicken wire, 1/2 gallon plastic milk jug, and PVC pipe armature. I hope this guy will become part of a scare crow for our steadily growing garden. I hav...

Baby Turtle

Image
We found this cute little guy while digging in the garden. What a beauty! So happy I didn't hurt him as I intruded on his domain with shovel and pickax. That's a slice of banana in the second photo. You can see how tiny he is.

Sidewalk, Concrete Modeling Clay 2

Image
I finished the little sidewalk leading to the gazebo structure, then created a little bed of mulch next to it to better display the good ol' papercrete hand -- one of my first efforts in papercrete and holding up very well. Then I set my "faces stepping stones" in mortar on either side of the walkway, and finally, after adding some fence and pieces of rebar, poured the slab. So far the difficulty with modeling in concrete (sans paper) is moisture. Very tricky, at best. A hair too much water turns a sand and cement mixture to mush. Then I'm back to adding more sand and cement, trying to firm things up. So far, the best way to mix "concrete modeling clay" is in very small quantities by (rubber gloved) hand. Adding joint compound to the damp, crumbly mix of sand, cement and water makes a soft, sticky "clay" that is still not ideal and makes detail difficult. Even moisture left on the gloves from washing off after mixing will quickly absorb into the m...

Concrete "Modeling Clay", Sidewalk, & Aquaponics

Image
These stepping stones are primarily made of mortar -- one part Portland cement, two parts sand, water to a pasty consistency. The faces are modeled with the same mixture, only with less water -- the mortar was only damp and was clumping a bit -- and a fair amount of ready mix joint compound. A fair amount meaning...a big gob. A handful. I'm hoping these pieces will become part of one section the sidewalk I've been working on. They will be set at either side of a walkway. This was my first effort at modeling with cement sans cellulose fiber (i.e. papercrete). The "concrete clay" handled pretty well, so I think it's something I can build on regarding my efforts at outdoor sculpture. I have no idea how well this "soft" concrete that is so inundated with joint compound will fare in the elements. Friday I finally got to work on the sidewalk leading to the gazebo, pouring 12 80-pounds bags of concrete mix. On the Aquaponics front, we ran the pump five hours on...

Aquaponics 3: Working Out The Bugs

Image
This is an "ebb and flow" aquaponics system, and I originally thought a timer would be the simplest way to go. Most resources recommend 15 minute intervals. The way I understood that, the pump would fill the grow bed to the proper level over 15 minutes (while the bed was simultaneously draining), then the timer would turn it off, and bed would finish draining, and then the timer would turn the pump back on so the bed would fill again. It sounds so simple. The timer I had on hand offered 30 minute intervals. I tried to time things out so that the pump filled the grow bed to an appropriate level while the grow bed drained slowly enough. There was some trial and error. By the end of the day the Bell Siphon was looking good. In a Bell Siphon system the pump runs continuously. It fills the grow bed to a certain level, at which time the siphon kicks in and drains the bed. The height of the "stand pipe" in the Bell Siphon (generally an inch or two below the level of the gr...